Ubuntu 16.04 LTS で SNMP Agent を構築していく。
snmp、snmpd、snmp-mibs-downloader をインストールする。
$ sudo apt-get install snmp snmpd snmp-mibs-downloader
/etc/snmp/snmp.conf の mibs : 行をコメントアウトする。(+ALL でもいい?)
$ diff -u <(zcat /etc/snmp/snmp.conf.gz) /etc/snmp/snmp.conf
--- /dev/fd/63  2017-07-07 16:04:36.230571510 +0000
+++ /etc/snmp/snmp.conf 2017-07-07 16:04:15.106009951 +0000
@@ -1,4 +1,4 @@
 # As the snmp packages come without MIB files due to license reasons, loading
 # of MIBs is disabled by default. If you added the MIBs you can reenable
 # loading them by commenting out the following line.
-mibs :
+#mibs :
/etc/snmp/snmpd.conf の agentAddress 行と rocommunity public 行を編集する。本来は IP アドレスを制限すべきだが、LXC 内のネットワークを使用するので無制限とした。
$ diff -u <(zcat /etc/snmp/snmpd.conf.gz) /etc/snmp/snmpd.conf
--- /dev/fd/63  2017-07-07 16:07:20.342934468 +0000
+++ /etc/snmp/snmpd.conf        2017-07-07 16:06:45.642011890 +0000
@@ -12,9 +12,9 @@
 #

 #  Listen for connections from the local system only
- agentAddress  udp:127.0.0.1:161
+#agentAddress  udp:127.0.0.1:161
 #  Listen for connections on all interfaces (both IPv4 *and* IPv6)
-#agentAddress udp:161,udp6:[::1]:161
+ agentAddress udp:161,udp6:[::1]:161


@@ -47,6 +47,7 @@

                                                  #  Full access from the local host
 #rocommunity public  localhost
+ rocommunity public  10.0.3.0/24
                                                  #  Default access to basic system info
  rocommunity public  default    -V systemonly
                                                  #  rocommunity6 is for IPv6
snmpd を再起動する。
$ sudo systemctl restart snmpd
Zabbix Server から snmpwalk を使って接続をテストしてみる。下記のような表示が返ってくればOK。
zabbix-server$ snmpwak -v2c -c public 10.0.3.98
SNMPv2-MIB::sysDescr.0 = STRING: Linux snmp_agent_2 4.4.0-83-generic #106-Ubuntu SMP Mon Jun 26 17:54:43 UTC 2017 x86_64
SNMPv2-MIB::sysObjectID.0 = OID: NET-SNMP-MIB::netSnmpAgentOIDs.10
DISMAN-EVENT-MIB::sysUpTimeInstance = Timeticks: (115105) 0:19:11.05
SNMPv2-MIB::sysContact.0 = STRING: Me <me@example.org>
SNMPv2-MIB::sysName.0 = STRING: snmp_agent_2
SNMPv2-MIB::sysLocation.0 = STRING: Sitting on the Dock of the Bay
SNMPv2-MIB::sysServices.0 = INTEGER: 72
SNMPv2-MIB::sysORLastChange.0 = Timeticks: (0) 0:00:00.00
SNMPv2-MIB::sysORID.1 = OID: SNMP-MPD-MIB::snmpMPDCompliance
SNMPv2-MIB::sysORID.2 = OID: SNMP-USER-BASED-SM-MIB::usmMIBCompliance
:
:
Zabbix でホストを登録する。今回は SNMP なので「SNMPインターフェイス」で作成する。

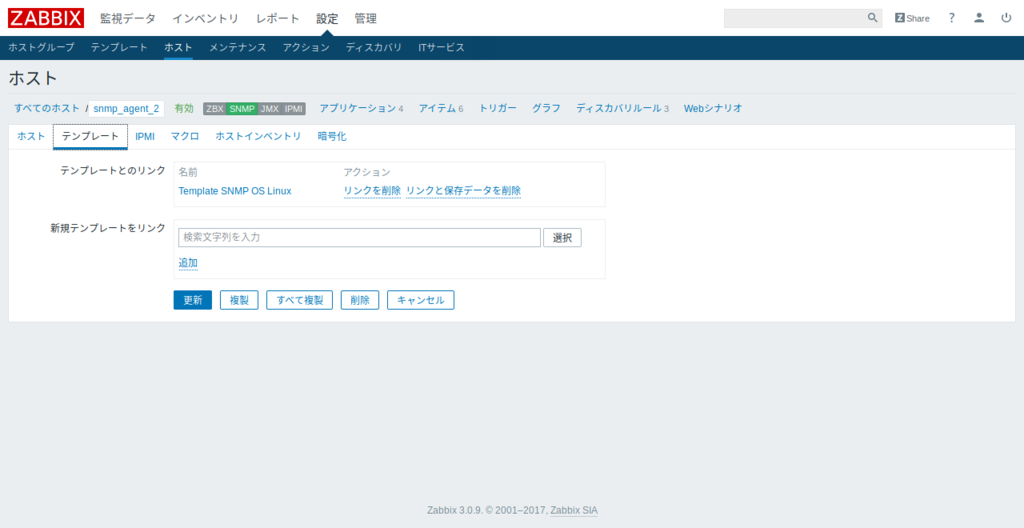
テンプレートのタブで「Template SNMP OS Linux」を追加する。

データが「最新データ」に反映されていたらOK。